Meta moves these menus around more than most. In June 2025 Facebook renamed the Videos tab to Reels, and every video you post is now shared as a reel, whatever its length or shape. So some older guides no longer match what you see. The steps below come from Facebook's and Meta's help centers at the time of writing (October 2026). Where a menu differs by account type, we say so.
1. Facebook auto captions
According to Meta's page About auto-generated captions on Facebook Reels, captions are generated automatically, and switched on by default, when you upload a reel:
- on a phone, from a Facebook Page or a profile in professional mode;
- on a computer, from a Page, a profile in professional mode, or Meta Business Suite.
A plain personal profile isn't on that list. If you post from one, don't expect captions to appear on their own.
Each set of auto captions gets an accuracy rating, based on things like sound quality and background noise. There's also a setting that holds auto captions for your review before they go live. Turn it on. Speech recognition is good with clear speech and weak with names, brand terms and anything said over music, and a wrong word in a caption looks like your mistake, not Facebook's.
To switch auto captions off for every reel from a Page on a computer, Meta's turn-off instructions say: go to your Page's Settings, click Media, click Edit next to Auto-generated captions and subtitles, choose Don't auto-generate captions or subtitles, and save. On a phone the toggle is under Menu > Settings & privacy > Settings > Media, labeled Automatic closed captions. For a single reel on a phone, tap Closed captions on the Share reel screen and switch that same toggle off.
Auto captions also switch on a second feature. Meta's page on auto-generated subtitles says Facebook can translate a reel's speech into subtitles for viewers in other languages, but only if the reel has spoken dialogue or a voiceover, auto captions are on, and there are no subtitles burned into the picture. At the time of writing the list covers English, Arabic, Brazilian Portuguese, Latin American Spanish, Hindi, Indonesian, Tagalog, Tamil, Telugu, Urdu and Vietnamese. Keep that in mind before you pick option 3.
Posting from the Facebook app's reel editor? It also has a Captions button: Meta's reels creative tools page says it transcribes the audio and lets you pick a font and color. That puts the text onto the reel itself, much like Instagram's Captions sticker.
2. Upload your own caption file
If you want the words right the first time, or you need captions in more than one language, upload a SubRip (.srt) file. Facebook's help pages only ask for SRT, so a VTT or other format needs converting first; our overview of subtitle formats explains how they differ.
Name the file the way Facebook expects
The name matters as much as what's inside. Facebook's
naming convention is
filename.[language code]_[country code].srt. The codes are case sensitive: language in lower case, country in upper
case. US English is en_US.
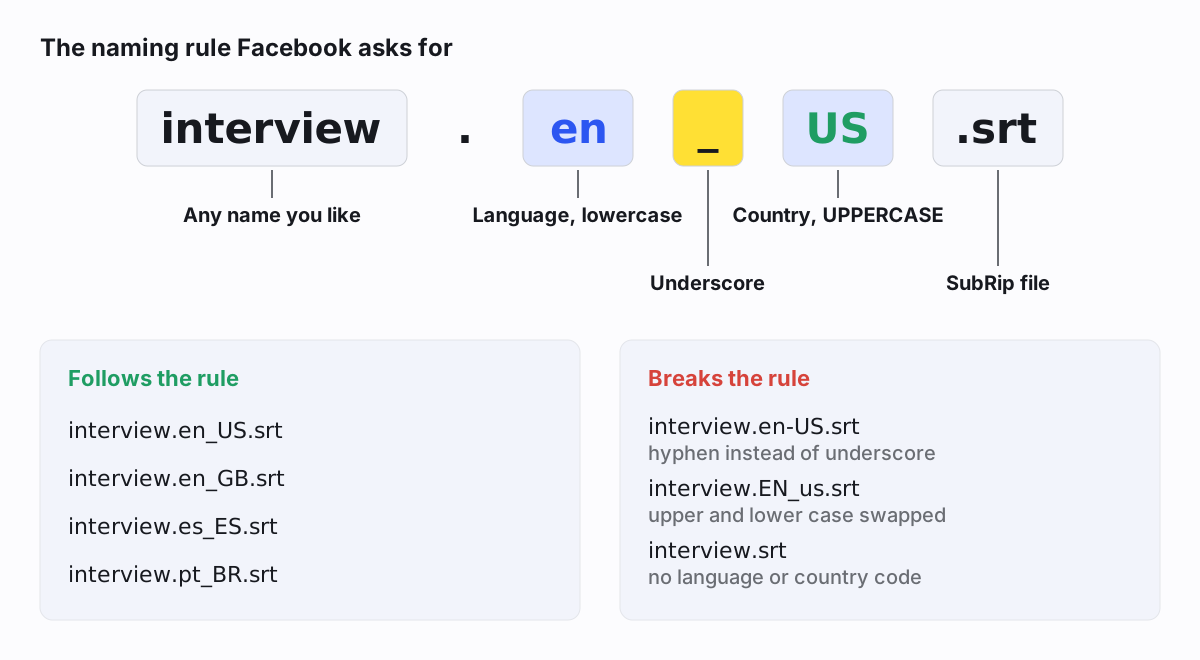
Most caption tools, ours included, download the file as something like interview.srt. Rename it before you upload, and make
sure the name ends in a single .srt.
Check the inside of the file
Facebook's page on problems adding captions lists what it expects inside the file. Every rule is about structure, so a file that looks fine in a text editor can still be rejected.
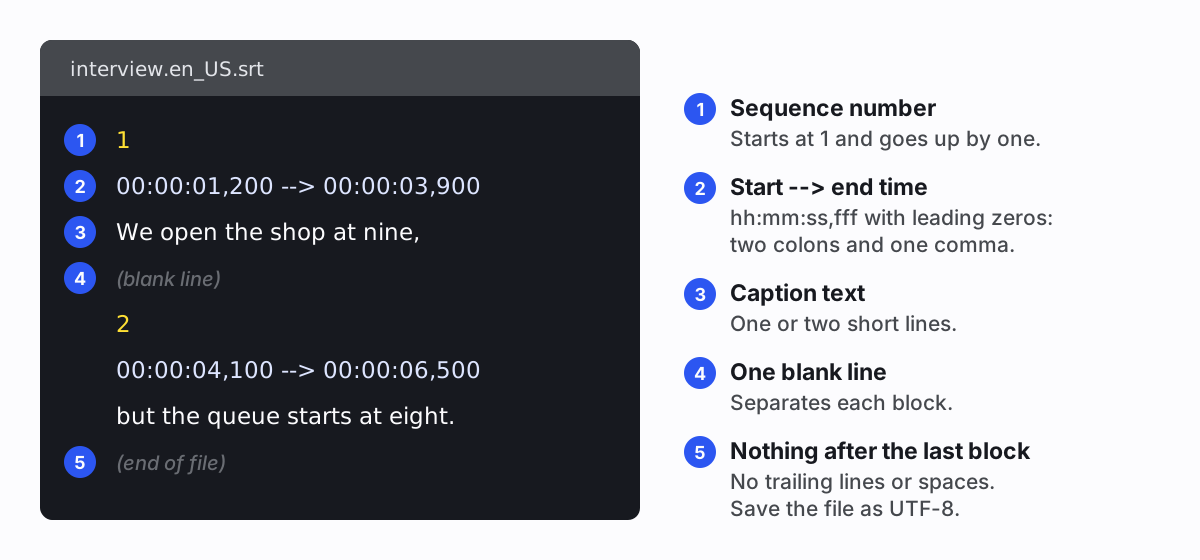
The usual culprits are hand-edited files. Someone deletes a block and the numbers skip. Someone writes a dot instead of a comma before the milliseconds, which is the VTT style. Or the file is saved in an older encoding and accented letters turn into junk. Facebook's fix for encoding trouble is to open the file in a text editor and save it again as UTF-8 under a new name.
If you make the file with our SRT generator, the structure is handled for you. It numbers blocks from 1,
writes full hh:mm:ss,fff timestamps, saves as UTF-8 and leaves nothing after the last block. You still need to rename
it, and you should still read the words.
Upload it
For a video on your profile, Facebook's help page on adding captions gives these steps on a computer:
- Post the video and wait for it to finish processing.
- Open the post, click Options in the top right, then Edit post.
- Click Edit in the composer, then Add captions.
- Click Upload next to Upload captions, choose your .srt file, and click Save.
- Repeat for each extra language.
For a Page, Facebook's Page video captions page puts a Closed captions option in the upload flow, where you can auto-generate and edit, type captions yourself, or upload an SRT. The same page notes that people who watch a Page's video with the sound off see captions automatically. With sound on, they have to turn captions on.
3. Burn captions in for Reels and the feed
Options 1 and 2 are closed captions: a separate text track that Facebook draws over the video when a viewer's settings allow it. That's good for accessibility, since viewers can hide them or change their look. But whether they show depends on the viewer's settings and the account you posted from, and they don't follow the video anywhere else.
Burned-in captions are part of the picture. Everyone sees them, on every device, and they look exactly as you styled them. For a clip that autoplays silently in the feed, you know the words are on screen from the first frame. To make them, drop the video into our tool that burns subtitles into video. It transcribes the audio (or uses an SRT you already have), you fix the words, pick a style, and export an MP4. The video is rendered in your browser and never uploaded, and there's no watermark.
Two Facebook-specific tips. First, don't stack two caption layers. Meta says it scans each uploaded reel for captions embedded in the picture and suggests deleting the auto captions if it finds them; take that advice, or viewers with captions on get the same words twice. The trade-off is that a reel with burned-in text doesn't qualify for Facebook's auto-translated subtitles, so if a big share of your audience speaks another language, a clean video with an SRT may serve them better.
Second, mind the bottom of the frame on vertical reels. Facebook puts your name, the description and buttons there, and our Karaoke, Classic and Boxed styles sit low enough to end up under them. Use the Bold pop style or raise the text. Our guide to subtitle position has the details.
How viewers turn Facebook captions on
Closed captions only help if viewers can find them. Facebook's help page for viewers says to go to Settings & privacy > Settings > Media on a computer and turn on Always show captions. On an iPhone, Facebook follows the system setting: Settings > Accessibility > Subtitles & Captioning, then turn on Closed Captions + SDH. It's worth knowing when a colleague says "I don't see your captions".
Which way should you pick?
| Auto captions | Your SRT file | Burned in | |
|---|---|---|---|
| Effort | None, then a review | Make, rename, upload | Make, style, export |
| You control the words | If you review them | Yes | Yes |
| Viewer can hide them | Yes | Yes | No |
| Other languages | Auto-translated subtitles in some languages | Yes, one file each | One per video, and no auto-translation |
| Reusable on YouTube and elsewhere | No | Yes | Yes |
| Show on muted autoplay | On Page videos, yes | On Page videos, yes | Always |
For a Page posting short clips, we'd burn captions in and turn auto captions off for those reels. For longer videos (a webinar, a talk, a tutorial), upload a checked SRT so viewers can control it. Both can come from one transcript, which is how we'd do it. The wider picture of what makes captions work for deaf and hard-of-hearing viewers is in our guide to video captioning.