Zoom produces three different kinds of text from a meeting, and they're easy to mix up: live captions, meeting transcripts and recording transcripts. They have different settings, different plan requirements and different files. This guide goes through each, then shows how to caption a recording that has none of them. Menu names are from Zoom's help center at the time of writing (October 2026), and Zoom's menus do change.
How Zoom captions work now
In May 2026 Zoom split captions and transcripts into separate features. Its FAQ on the change calls captions "a live accessibility feature". You can scroll back through about the last three minutes during the meeting. After it ends, captions can't be saved or downloaded, although they still show when you play back a recording. If you used to click Save transcript in the captions menu to keep notes, that job now belongs to meeting transcripts.
Turn on Zoom captions as the host
Automated captions are a setting on your account first, then a button in the meeting. Per Zoom's article on enabling automated captions, they're on by default for paid accounts. Zoom announced them for free accounts back in 2021. To check the setting:
- Sign in to the Zoom web portal and click Settings.
- Open the Meeting tab and scroll to In Meeting (Advanced).
- Turn on the Automated captions toggle.
- Optional: click the pencil icon to choose which caption languages are available, or tick Allow only the following users to enable captions for the meeting to keep control with the host or co-hosts.
- Click Save.
If a toggle is grayed out, an admin has locked it at the account or group level. In the meeting, click Show captions in the toolbar to start them. To switch captions off for everyone, click the arrow next to Show captions, then under Host controls choose Host caption control settings and turn off Allow closed captioning for this meeting (Zoom's host guide).
What attendees see and can change
Each attendee decides whether to show captions for themselves. Zoom's viewing captions article lists the buttons by device:
| Where you joined | How to show captions |
|---|---|
| Desktop app | Show captions in the toolbar, or More, then Show captions |
| Mobile app | More, then Show CC |
| Web app | Show Captions in the toolbar |
On desktop, the arrow next to the captions button opens Caption settings, where you can change the font size, caption color and font, and pin the captions or pop them out into their own window. If the host hasn't enabled captions, the button reads Request captions instead. Click it, then Send, and the host gets a prompt to approve.
Each participant sets their own speaking language, and Zoom remembers it for later meetings. If your captions come out as nonsense, check that setting before blaming the microphone.
The Zoom transcript: meeting transcripts
Meeting transcripts are the saved record. They need a Pro, Business or Enterprise account and are off by default, so a host or admin has to turn them on and pick who can view and save them, for example whether all participants can see the transcript during the meeting (settings article).
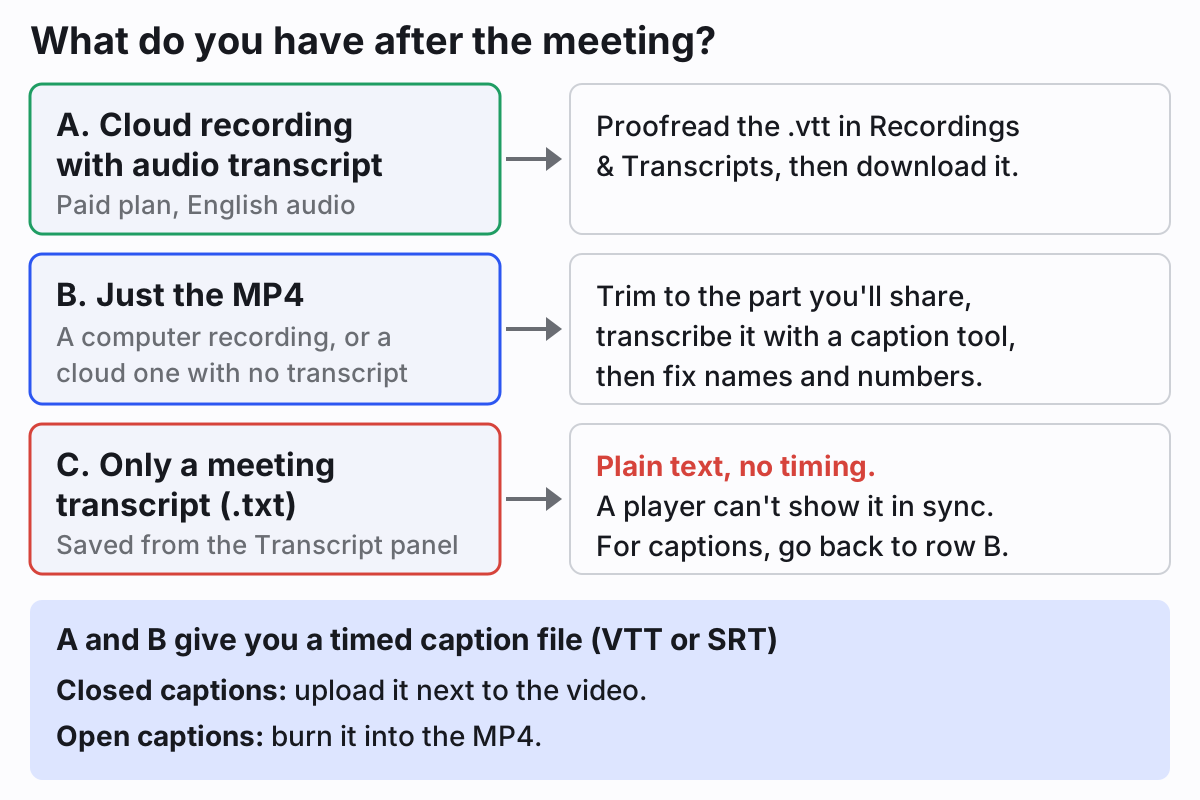
During a meeting, click More, then Transcript, and a Transcript panel opens on the right. At the bottom, Save transcript writes a .txt file to the Zoom folder in your Documents (using meeting transcripts). It's useful for notes and search. It isn't a caption file, so a video player can't show it in sync.
Cloud recording transcripts (.vtt)
If you record to the cloud, Zoom can also transcribe the recording. This needs a Pro, Business, Education or Enterprise account with cloud recording enabled, and Zoom's audio transcription article says it supports English only. To turn it on, go to Settings, open the Recording tab, make sure Cloud recording is on, tick Create audio transcript under Advanced cloud recording settings, and click Save.
After the meeting, the transcript shows up in the web portal under Recordings & Transcripts, on the Cloud recordings tab. Zoom warns it can take a while longer to process than the recording itself. You can edit it there by hovering over a line and clicking the pencil icon, which is also how you rename anyone listed as "Unknown Speaker". Then download it.
Zoom's list of recording file formats names two text files for cloud recordings: a VTT with the audio transcript and a CC.VTT with the closed captions. Both are WebVTT, a timed caption format most players and platforms accept. Our explainer on what a VTT file is shows what's inside one. Zoom's transcript includes speaker names, and they come along into the caption text, which is helpful in a panel and cluttered in a one-person talk, so delete them there before you publish.
How to add captions to a Zoom recording
What you do depends on what you have. Recording to your computer (Zoom calls this a computer recording; you may know it as a local recording) works on free accounts but gives you only the video and audio, with no transcript.
If you have a cloud recording with a transcript
- Fix names and terms in the transcript on the Recordings & Transcripts page, then download the MP4 and the VTT.
- For closed captions, upload the VTT next to the video on your platform. Some platforms only take SRT. Our SRT generator opens the VTT with the video and exports it as SRT.
- For captions that show everywhere, load both files into the burn-in tool, style them and export an MP4.
If you only have the MP4
- Find the file. In the Zoom desktop app, go to the Home tab, click Open recordings, and pick the Computer recordings tab (Zoom's steps). By default the files are in a Zoom folder inside Documents. Zoom converts the recording when the meeting ends, so wait for that to finish.
- Cut the part you want to share if the meeting is long. Our tool takes up to 30 minutes per video, and visitors can transcribe 20 minutes a day, so a clip of 20 minutes or less fits in one go.
- Open the MP4 in our video to text tool. The video stays in your browser. Only a compressed audio track is sent for transcription.
- Fix names and numbers, and type in speaker names where viewers need them. Our tool doesn't label speakers on its own.
- Download a TXT for notes, an SRT or VTT for closed captions, or render an MP4 with the captions burned in.
One trap: if you trim the start of a recording after Zoom made its VTT, every caption will now be late by the amount you cut. Either transcribe the trimmed file fresh or shift the whole file, as explained in our guide to subtitles that are out of sync.
Are Zoom's captions good enough for accessibility?
For following a live meeting, they help a lot and cost nothing extra. For a recording you publish, treat any machine transcript, Zoom's or ours, as a draft. Proofread it, add speaker names where it isn't obvious who is talking, and describe sounds that matter. Our guide to accessible video captioning has a checklist you can run before you post.