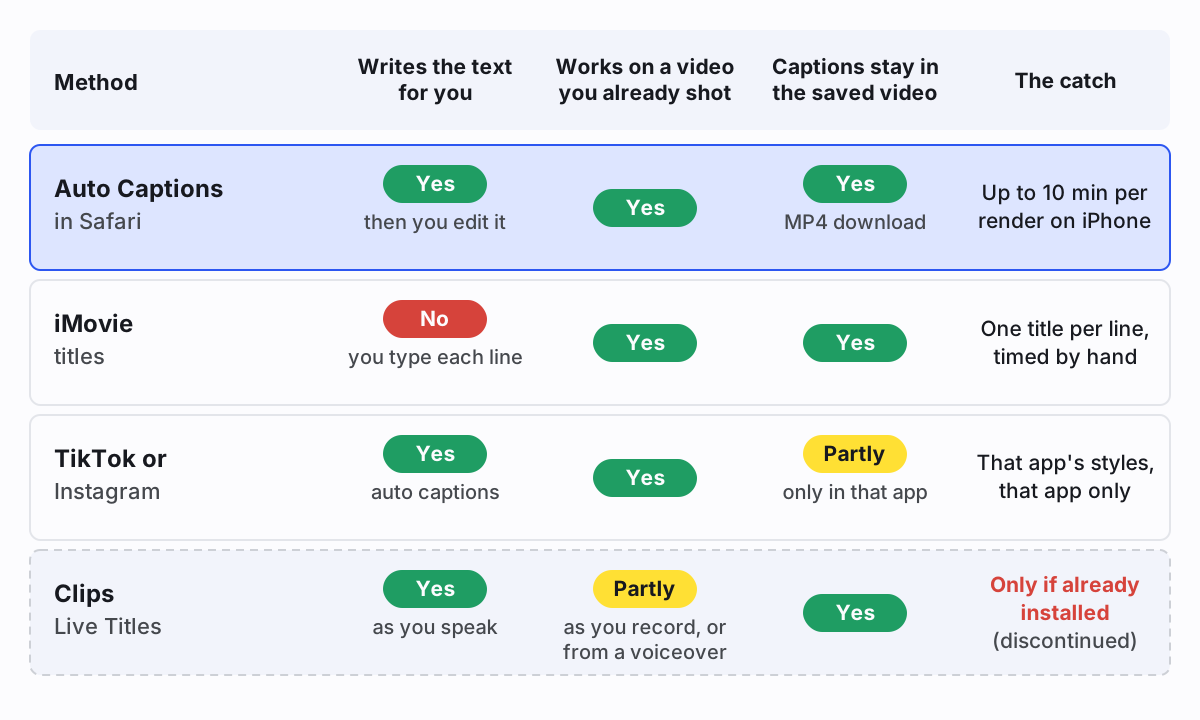
Your iPhone has no "add captions" button in Photos. What it has instead is a handful of apps that each do part of the job. Which one you want depends on two things: whether you want the text written for you, and whether the captions need to stay in the video when you post it somewhere else. The table compares the free options. Apple's Clips app comes last, because only people who installed it before Apple withdrew it can still use it.
1. Add subtitles to video on iPhone with Safari
This is the route we built, so we'll be specific about how it behaves on a phone. Our auto caption generator runs in the browser. The video is opened and rendered on your iPhone, and only a small compressed audio track is sent off to be transcribed. It needs the WebCodecs video encoder, which Safari has had since version 16.4. If your iPhone is on an older iOS, the export panel tells you your browser can't encode video.
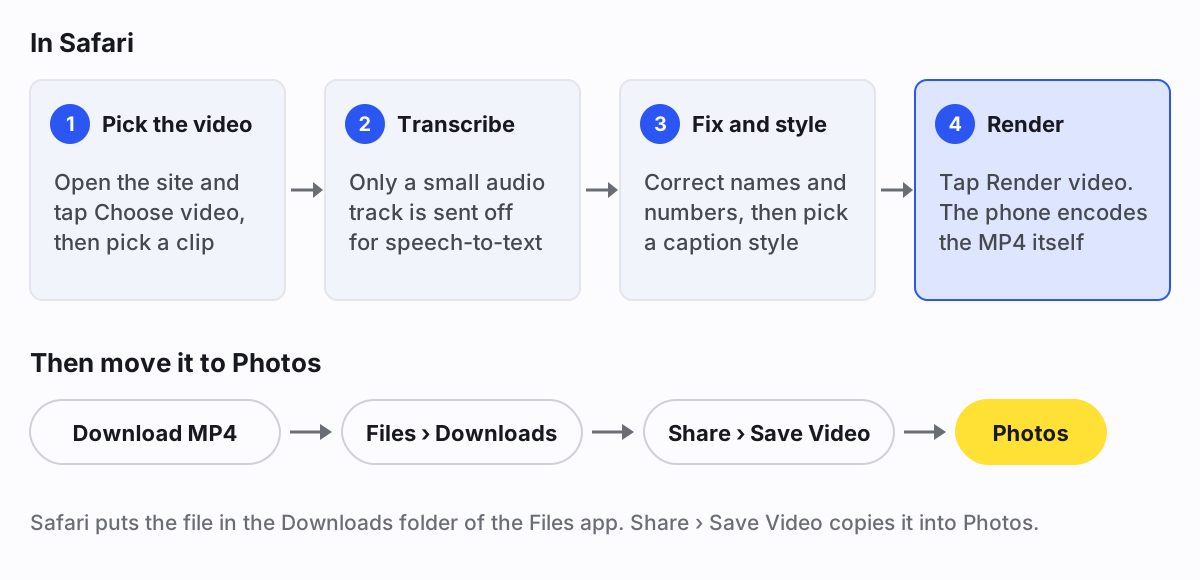
- Open auto-caption.app in Safari and tap Choose video. Pick the clip from your photo library.
- Transcription starts on its own. A vertical video gets short lines of about 22 characters, so they fit a 9:16 frame.
- Read through the lines. Tap one to fix a word, a name or a number. Split or merge lines if a break lands in the wrong place.
- Pick a style. For anything headed to Reels, TikTok or Shorts, Bold pop is the safe choice because it sits higher in the frame. The other three presets sit near the bottom, where those apps put their buttons and captions, so raise the position slider if you use one. Our guide to subtitle position explains where text gets covered.
- Tap Render video and keep Safari open until it finishes. Then tap Download MP4.
- Safari puts the file in the Downloads folder of the Files app (Apple explains where to find downloads on iPhone). Open it, tap Share, then Save Video to move it into Photos.
Now the limits. Videos can be up to 30 minutes, and each visitor gets 20 minutes of transcription a day. On an iPhone the burned-in render tops out at 10 minutes, because Safari can't stream a long file to disk the way Chrome on a computer can. A 4K clip is set to render at 1080p by default, which is plenty for social apps. Past 10 minutes, download the SRT or VTT file instead, or do the render on a computer.
One thing to know before you start: speech recognition gets the common words right and trips on names, brands and anything said over loud music. Budget a minute or two to read the transcript. That's still far quicker than typing every line.
2. iMovie titles
iMovie is free on every iPhone and it can put text on a video. It can't write the text for you, and it has no caption track or subtitle file import. Each caption is a title you add by hand. The steps from Apple's iMovie for iPhone guide, at the time of writing (October 2026):
- Open your project and tap the clip in the timeline to show the inspector.
- Tap the Titles button and pick a title style.
- Tap the sample title in the viewer, tap Edit, and type your caption.
- Tap More and turn on Full Clip Duration so it stays up for the whole clip.
The catch is that a title belongs to a clip. For a new caption every few seconds, you split the clip at each line change and give every piece its own title. That's fine for a 20-second clip with four lines. For a five-minute talk it's an hour or more of tapping. Our guide on subtitles in iMovie covers this on Mac and iPhone, and a faster way around it.
3. Captions inside TikTok or Instagram
If the video is only going to one app, that app's own captions are the least work. TikTok's editor has a Captions option that transcribes the speech and lets you correct the text before you post. Instagram has a Captions sticker you add while editing a reel, plus automatic closed captions that viewers can switch on. Menus in both apps change often, so the exact buttons may differ. Our guides to captions on TikTok and to captions on Instagram Reels walk through both.
The limit is that those captions live inside that one app, in its styles. Post the same clip to Facebook or YouTube Shorts and you start again. If you cross-post, burning the captions in once (method 1) saves you doing it three times.
Only if it's already installed: Clips Live Titles
Apple has discontinued Clips. Since October 10, 2025 new users can't download it, and it gets no updates. If you never had it, skip this section. If you downloaded it before, you can reinstall it from your App Store purchases, and Apple says it keeps working on iOS 26 and earlier.
For those people, its Live Titles feature is still the closest thing the iPhone has to built-in auto captions: you speak while you record, and the words appear on the video in the style you picked. Apple's Clips guide describes the steps: tap the Effects button, then Live Titles, choose a style, and touch and hold the Record button while you talk. You can also add Live Titles to a voiceover, then use Edit Text to fix a line. Don't build a routine around it, though. An app that gets no updates can stop working after a future iOS release.
What about iPhone video captions in Accessibility settings?
It's easy to find Live Captions under Settings > Accessibility and assume it captions your videos. It doesn't, not in the way you want for posting. Apple's Live Captions page describes it as a real-time transcription of audio playing on your phone, shown to you while it plays. It's useful if you're hard of hearing and watching something, but nothing gets saved into the video file, and it isn't available in every language or region.
Which one should you use?
For a short clip you're posting to one app, use that app's captions. For anything you'll post in more than one place, or anything over a minute, let a tool write the captions and burn them in, then check the words. Use iMovie titles when you only need a few lines of text, like a name and a location, rather than full captions.
Whichever you pick, read the captions once with the sound off before you post. Plenty of people will watch it that way in a feed. Our video captioning guide covers what good captions include beyond the words, like speaker names and sounds that matter to the story.