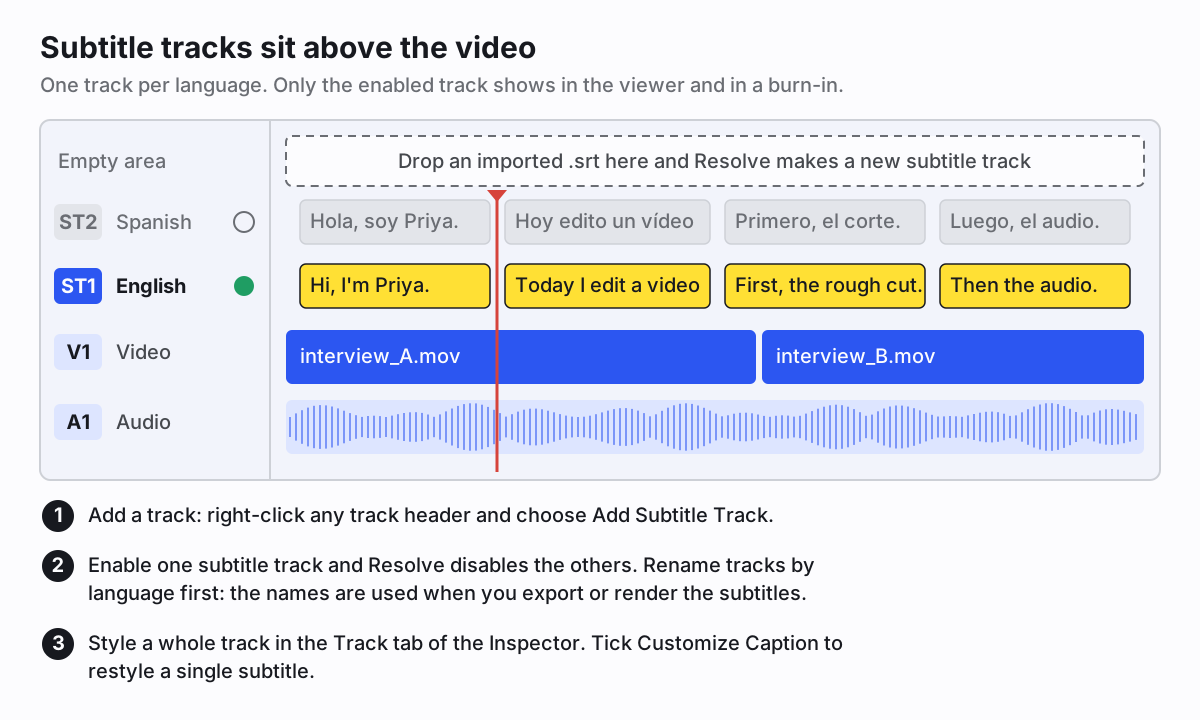
DaVinci Resolve subtitles live on their own track type, above the video. You can fill that track three ways: import a subtitle file, type subtitles by hand, or (in Studio) generate them from the audio. Everything except that last one works in the free version. The steps below follow Blackmagic's DaVinci Resolve 21 reference manual, chapter 59, "Subtitles and Closed Captioning", and all happen on the Edit page. Resolve moves things between versions, so on an older release a menu may sit in a slightly different place.
Free or Studio: what each can do with subtitles
The free version imports subtitle files, adds subtitle tracks, lets you write and time subtitles by hand, styles them, and exports them as files or burned into the render. Blackmagic's Edit page overview lists TTML, SRT, XML and embedded MXF/IMF subtitles as import formats. The manual adds WebVTT.
Two subtitle features are marked "Studio Version Only" in the manual: Create Subtitles from Audio, which transcribes your timeline, and AI Animated Subtitles, templates that highlight each word as it's spoken. At the time of writing (October 2026), Blackmagic's product page lists DaVinci Resolve Studio at $295. If you only caption a video now and then, you don't need it. Make the SRT somewhere else and import it.
Import an SRT to the media pool and timeline
This is the fastest route when you already have a subtitle file, whether a client sent it or you made it in another tool.
- Open the Media Pool on the Edit page.
- Right-click an empty part of the Media Pool (or any bin) and choose Import Subtitle. Pick your .srt and click Open. You can also drag the file in like any clip. It shows up with a subtitle badge.
- Get it onto the timeline. Right-click the subtitle clip and choose Insert Selected Subtitles to Timeline Using Timecode to place each line at its own timecode. Or drag the clip into the empty gray area above your video tracks, and Resolve creates a subtitle track for it.
- Double-click the track name and rename it after the language, for example "English". Resolve uses track names when it exports.
One trap catches almost everyone. Resolve timelines start at 01:00:00:00 by default, and an SRT from nearly any tool counts from 00:00:00. And when you drag a subtitle file in, the first subtitle lands where you drop it, not at its own time. If your first line is spoken 1.2 seconds in and you drop the file at the start of the timeline, every subtitle comes out 1.2 seconds early. Two fixes: right-click the timeline in the Media Pool, choose Timelines > Starting Timecode and set it to 00:00:00:00 before using the timecode insert, or drop the file with the first subtitle lined up on the first spoken word. If the lines still drift apart over the video, that's a frame rate problem, not an offset, and our guide to subtitles out of sync covers it.
Add a subtitle track and write captions manually
For a short clip, or to fix a handful of lines, typing is fine:
- Right-click any track header and choose Add Subtitle Track. A track named "Subtitle 1" appears at the top of the timeline.
- Move the playhead to where the first subtitle should start.
- Right-click the subtitle track and choose Add Subtitle. You can also click Create Caption in the Captions panel of the Inspector (it becomes Add New once the track has captions), or drag the Subtitle generator from Effects > Titles.
- Type the text in the Captions panel of the Inspector. It appears on the clip as you type.
- Drag the clip's edges to match the speech, then move on to the next line.
Before you type a lot of them, set the quality checks. In Project Settings, the Subtitles panel has thresholds for Characters Per Line, Minimum Caption Duration and Maximum Characters Per Second. When a subtitle breaks them, its CPS value turns red in the Inspector. Which numbers to use depends on the audience and the language. Our subtitle guidelines go through line length and reading speed, with sources.
Style subtitles in the track inspector
Click the subtitle track's header, open the Inspector and choose the Track tab. Everything there applies to every subtitle on the track: font and font face, color, size, line spacing, kerning, alignment, position X and Y, zoom, opacity and text anchoring. At the bottom are Drop Shadow, Stroke and Background. For one line that needs to look different, select it, tick Customize Caption in the Captions panel, and change only that one.
Our default for talking-head video is white text with a black stroke, or a semi-opaque dark background if the footage is busy. Leave position alone unless something important sits at the bottom of the frame. When you have a look you like, open the three-dot menu at the top right of the subtitle Inspector and choose Save Track as Preset, so the next project starts there.
For more control, you can drag a Fusion title template onto the subtitle track header, which overrides the Inspector styling. Studio also has the Animated templates for word-by-word highlighting.
Automatic subtitles in Studio
If you have Studio, Resolve can transcribe the timeline for you:
- Open the timeline. Set In and Out points if you only want part of it transcribed.
- Choose Timeline > AI Tools > Create Subtitles from Audio.
- Pick the Language (or Auto), a Caption Preset, Max Characters per Line, single or double Lines, and the Gap Between Subtitles.
- Click Create. The subtitles go onto a subtitle track, created for you if there isn't one.
The manual lists 14 built-in languages, with more (Hindi, Arabic, Polish, Turkish and dozens of others) in an extended transcription package you download from the Extras Download Manager. It also admits the tool struggles when dialogue overlaps across several audio tracks. Mute the tracks you don't want transcribed. Then read every line, since names and numbers are where speech recognition trips up.
On the free version, the workaround is simple. Run the exported video through our free SRT generator, correct the text there, and import the SRT as above. It won't know your timeline, but for a finished edit that doesn't matter.
Export: burned in, separate file or embedded
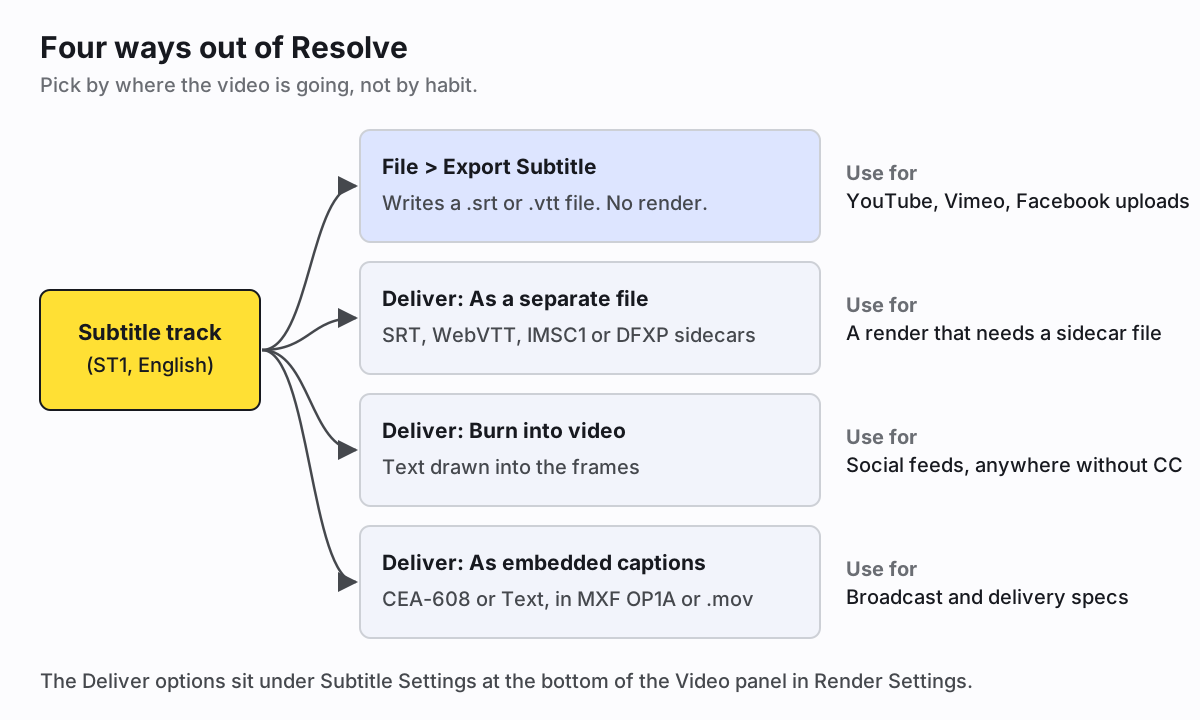
For just the file, choose File > Export Subtitle, or right-click the subtitle track header and choose
Export Subtitle. You get a .srt or .vtt without rendering anything, which is all YouTube, Vimeo or Facebook need.
For Facebook, name the SRT with a language and country code, like talk.en_US.srt. Our overview of
subtitle formats covers which platform takes which file.
To handle subtitles as part of a render, go to the Deliver page. At the bottom of the Video panel in the render settings is a Subtitle Settings group. Tick Export Subtitle, then pick a Format:
- As a separate file writes the tracks you tick as sidecar files next to the video. Export As offers IMSC1, DFXP, SRT and WebVTT.
- Burn into video draws the currently selected subtitle track into every frame. Use it for Instagram, TikTok and anywhere without a CC button.
- As embedded captions puts the selected track inside the file as CEA-608 or Text captions. The manual lists support in MXF OP1A and QuickTime files.
For a YouTube video, export the clean render plus an SRT. For a social clip, burn in. If you need both, render twice from the same timeline. The captions only have to be right once.
If you also edit in other apps
The free version of Resolve goes further with subtitles than most free editors. Final Cut Pro handles captions through roles and a caption lane, and its automatic transcription is English-only; see our walkthrough of Final Cut Pro captions. iMovie has much less to offer, as our guide on adding subtitles in iMovie explains. If you don't need an editor at all, our auto captions tool transcribes a finished video and burns in styled captions without a timeline.